

Valve positioner installation instructions
Valve positioner is an important accessory used in pneumatic valve to adjust flow. It is usually used with pneumatic actuator. It can control valve opening by receiving the signal of 4-20mA in controller or control system, so as to control the process parameters of pipeline medium accurately. Valve positioner is composed of pneumatic actuator, and then connected with various automatic control units or valves. After debugging and installation, it is combined into pneumatic regulating valve valve, which is used in various industrial automation process control fields. Valve positioner can be divided into pneumatic valve positioner, electrical valve positioner and intelligent valve positioner according to structure.
[valve positioner installation process]
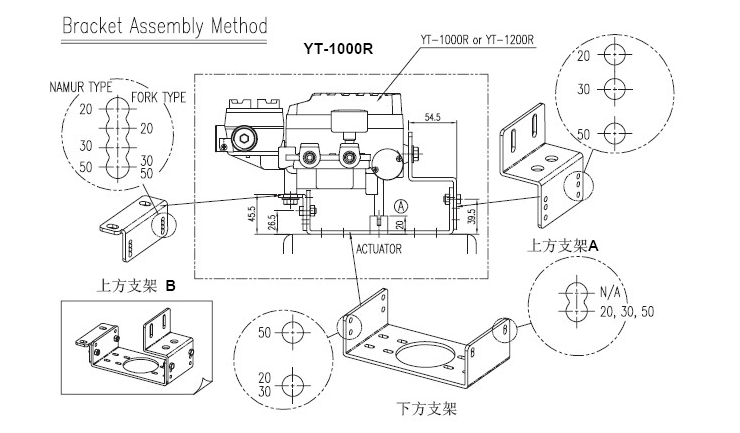

1. The height (H) of the shaft of the general pneumatic actuator can be divided into three types: 20, 30 and 50mm. After confirming the height of the actuator shaft, assemble the bracket according to the picture below.
2. Connect the bracket to the bracket of the actuator with hexagon head bolt. The bore diameter connected to the bracket of the actuator is 6mm, so the appropriate screw must be selected. In order to prevent the screw from being loosened by vibration, please use spring washer or other methods to install. The installation direction of the support is different according to the service conditions, but it is generally recommended to install in the following direction, which is the same direction of the actuator piping and valve positioner piping.
3. Align the rotation position of the actuator shaft with the starting position, i.e. 0% of the opening. When the actuator is a single acting cylinder with spring, if the air supply pressure is not input, the cylinder shaft always returns to the starting point, so it is easy to confirm. When double acting cylinder, please refer to the cylinder instruction to confirm whether it is clockwise or counter clockwise, or input the direction of rotation of cylinder shaft when air pressure is input.
4. After setting the fork bar, tighten the fixing screw under the fork bar clockwise. Install the valve positioner on the bracket. When the valve positioner is placed above the bracket, the fixing tip under the spindle is aligned with the center hole above the fork bar, and the connecting rod on the spindle feedback rod is inserted into the slot of the fork bar. This is to make the spindle of valve positioner consistent with the center of cylinder shaft. If the center is not aligned, the load force will be generated on the spindle of valve positioner, which will affect the internal composition of the product. Therefore, please align the center correctly.
5. Fix the valve positioner and bracket with hexagon bolts and washers. When fixing bolts, do not tighten the bolts completely in turn, but after the four bolts are screwed to a certain extent, confirm the correct position of the valve positioner and then tighten the four bolts.
Valve positioner can increase the output power of the regulating valve, reduce the delay of the transmission of the regulating signal, accelerate the speed of valve stem movement, improve the linearity of the valve, overcome the friction force of the valve stem and eliminate the influence of unbalanced force, so as to ensure the correct positioning of the regulating valve.